WireGuard
WireGuard is an extremely simple yet fast and modern VPN that utilizes state-of-the-art cryptography. See https://www.wireguard.com for more information.
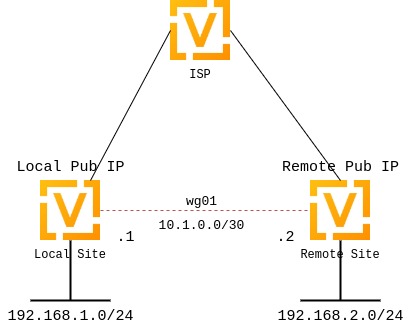
Site to Site VPN
This diagram corresponds with the example site to site configuration below.
Keypairs
WireGuard requires the generation of a keypair, which includes a private key to decrypt incoming traffic, and a public key for peer(s) to encrypt traffic.
Generate Keypair
It generates the keypair, which includes the public and private parts, and stores it within VyOS. It will be used per default on any configured WireGuard interface, even if multiple interfaces are being configured.
Generate Named Keypair
Named keypairs can be used on a interface basis when configured. If multiple WireGuard interfaces are being configured, each can have their own keypairs.
Interface configuration
The next step is to configure your local side as well as the policy based trusted destination addresses. If you only initiate a connection, the listen port and address/port is optional; however, if you act like a server and endpoints initiate the connections to your system, you need to define a port your clients can connect to, otherwise the port is randomly chosen and may make connection difficult with firewall rules, since the port may be different each time the system is rebooted.
You will also need the public key of your peer as well as the network(s) you want to tunnel (allowed-ips) to configure a WireGuard tunnel. The public key below is always the public key from your peer, not your local one.
local side - commands
WireGuard interface itself uses address 10.1.0.1/30
We only allow the 192.168.2.0/24 subnet to travel over the tunnel
Our remote end of the tunnel for peer to-wg02 is reachable at 192.0.2.1 port 51820
The remote peer to-wg02 uses XMrlPykaxhdAAiSjhtPlvi30NVkvLQliQuKP7AI7CyI= as its public key portion
We listen on port 51820
We route all traffic for the 192.168.2.0/24 network to interface wg01
set interfaces wireguard wg01 address '10.1.0.1/30'
set interfaces wireguard wg01 description 'VPN-to-wg02'
set interfaces wireguard wg01 peer to-wg02 allowed-ips '192.168.2.0/24'
set interfaces wireguard wg01 peer to-wg02 address '192.0.2.1'
set interfaces wireguard wg01 peer to-wg02 port '51820'
set interfaces wireguard wg01 peer to-wg02 pubkey 'XMrlPykaxhdAAiSjhtPlvi30NVkvLQliQuKP7AI7CyI='
set interfaces wireguard wg01 port '51820'

set protocols static interface-route 192.168.2.0/24 next-hop-interface wg01
The last step is to define an interface route for 192.168.2.0/24 to get through the WireGuard interface wg01. Multiple IPs or networks can be defined and routed. The last check is allowed-ips which either prevents or allows the traffic.
Warning
You can not assign the same allowed-ips statement to multiple WireGuard peers. This a design decision. For more information please check the WireGuard mailing list.
To use a named key on an interface, the option private-key needs to be set.
set interfaces wireguard wg01 private-key KP01
The command show wireguard keypairs pubkey KP01 will then show the
public key, which needs to be shared with the peer.
remote side - commands
set interfaces wireguard wg01 address '10.1.0.2/30'
set interfaces wireguard wg01 description 'VPN-to-wg01'
set interfaces wireguard wg01 peer to-wg01 allowed-ips '192.168.1.0/24'
set interfaces wireguard wg01 peer to-wg01 address '192.0.2.2'
set interfaces wireguard wg01 peer to-wg01 port '51820'
set interfaces wireguard wg01 peer to-wg01 pubkey 'EKY0dxRrSD98QHjfHOK13mZ5PJ7hnddRZt5woB3szyw='
set interfaces wireguard wg01 port '51820'

set protocols static interface-route 192.168.1.0/24 next-hop-interface wg01
Firewall Exceptions
For the WireGuard traffic to pass through the WAN interface, you must create a firewall exception.
set firewall name OUTSIDE_LOCAL rule 10 action accept
set firewall name OUTSIDE_LOCAL rule 10 description 'Allow established/related'
set firewall name OUTSIDE_LOCAL rule 10 state established enable
set firewall name OUTSIDE_LOCAL rule 10 state related enable
set firewall name OUTSIDE_LOCAL rule 20 action accept
set firewall name OUTSIDE_LOCAL rule 20 description WireGuard_IN
set firewall name OUTSIDE_LOCAL rule 20 destination port 51820
set firewall name OUTSIDE_LOCAL rule 20 log enable
set firewall name OUTSIDE_LOCAL rule 20 protocol udp
set firewall name OUTSIDE_LOCAL rule 20 source
You should also ensure that the OUTISDE_LOCAL firewall group is applied to the WAN interface and a direction (local).
set interfaces ethernet eth0 firewall local name 'OUTSIDE-LOCAL'
Assure that your firewall rules allow the traffic, in which case you have a working VPN using WireGuard.
wg01# ping 192.168.1.1
PING 192.168.1.1 (192.168.1.1) 56(84) bytes of data.
64 bytes from 192.168.1.1: icmp_seq=1 ttl=64 time=1.16 ms
64 bytes from 192.168.1.1: icmp_seq=2 ttl=64 time=1.77 ms

wg02# ping 192.168.2.1
PING 192.168.2.1 (192.168.2.1) 56(84) bytes of data.
64 bytes from 192.168.2.1: icmp_seq=1 ttl=64 time=4.40 ms
64 bytes from 192.168.2.1: icmp_seq=2 ttl=64 time=1.02 ms
An additional layer of symmetric-key crypto can be used on top of the asymmetric crypto. This is optional.
wg01# run generate wireguard preshared-key
rvVDOoc2IYEnV+k5p7TNAmHBMEGTHbPU8Qqg8c/sUqc=
Copy the key, as it is not stored on the local filesystem. Because it is a symmetric key, only you and your peer should have knowledge of its content. Make sure you distribute the key in a safe manner,
wg01# set interfaces wireguard wg01 peer to-wg02 preshared-key 'rvVDOoc2IYEnV+k5p7TNAmHBMEGTHbPU8Qqg8c/sUqc='
wg02# set interfaces wireguard wg01 peer to-wg01 preshared-key 'rvVDOoc2IYEnV+k5p7TNAmHBMEGTHbPU8Qqg8c/sUqc='
Remote Access “RoadWarrior” Example
With WireGuard, a Road Warrior VPN config is similar to a site-to-site
VPN. It just lacks the address and port statements.
In the following example, the IPs for the remote clients are defined in
the peers. This allows the peers to interact with one another. In
comparison to the site-to-site example the persistent-keepalive
flag is set to 15 seconds to assure the connection is kept alive.
This is mainly relevant if one of the peers is behind NAT and can’t
be connected to if the connection is lost. To be effective this
value needs to be lower than the UDP timeout.
wireguard wg01 {
    address 10.172.24.1/24
    address 2001:db8:470:22::1/64
    description RoadWarrior
    peer MacBook {
        allowed-ips 10.172.24.30/32
        allowed-ips 2001:db8:470:22::30/128
        persistent-keepalive 15
        pubkey F5MbW7ye7DsoxdOaixjdrudshjjxN5UdNV+pGFHqehc=
    }
    peer iPhone {
        allowed-ips 10.172.24.20/32
        allowed-ips 2001:db8:470:22::20/128
        persistent-keepalive 15
        pubkey BknHcLFo8nOo8Dwq2CjaC/TedchKQ0ebxC7GYn7Al00=
    }
    port 2224
}
The following is the config for the iPhone peer above. It’s important to
note that the AllowedIPs wildcard setting directs all IPv4 and IPv6 traffic
through the connection.
[Interface]
PrivateKey = ARAKLSDJsadlkfjasdfiowqeruriowqeuasdf=
Address = 10.172.24.20/24, 2001:db8:470:22::20/64
DNS = 10.0.0.53, 10.0.0.54

[Peer]
PublicKey = RIbtUTCfgzNjnLNPQ/ulkGnnB2vMWHm7l2H/xUfbyjc=
AllowedIPs = 0.0.0.0/0, ::/0
Endpoint = 192.0.2.1:2224
PersistentKeepalive = 25
However, split-tunneling can be achieved by specifying the remote subnets. This ensures that only traffic destined for the remote site is sent over the tunnel. All other traffic is unaffected.
[Interface]
PrivateKey = 8Iasdfweirousd1EVGUk5XsT+wYFZ9mhPnQhmjzaJE6Go=
Address = 10.172.24.30/24, 2001:db8:470:22::30/64

[Peer]
PublicKey = RIbtUTCfgzNjnLNPQ/ulkGnnB2vMWHm7l2H/xUfbyjc=
AllowedIPs = 10.172.24.30/24, 2001:db8:470:22::/64
Endpoint = 192.0.2.1:2224
PersistentKeepalive = 25
Operational Commands
Status
Get a list of all wireguard interfaces
Codes: S - State, L - Link, u - Up, D - Down, A - Admin Down
Interface        IP Address                        S/L  Description
---------        ----------                        ---  -----------
wg01             10.0.0.1/24                       u/u
Show general information about specific WireGuard interface
vyos@vyos:~$ show interfaces wireguard wg01
interface: wg01
  address: 10.0.0.1/24
  public key: h1HkYlSuHdJN6Qv4Hz4bBzjGg5WUty+U1L7DJsZy1iE=
  private key: (hidden)
  listening port: 41751

    RX:  bytes  packets  errors  dropped  overrun       mcast
             0        0       0        0        0           0
    TX:  bytes  packets  errors  dropped  carrier  collisions
             0        0       0        0        0           0
Encryption Keys
Show public key portion for specified key. This can be either the default
key, or any other named key-pair.
The default keypair
vyos@vyos:~$ show wireguard keypair pubkey default
FAXCPb6EbTlSH5200J5zTopt9AYXneBthAySPBLbZwM=
Name keypair KP01
vyos@vyos:~$ show wireguard keypair pubkey KP01
HUtsu198toEnm1poGoRTyqkUKfKUdyh54f45dtcahDM=
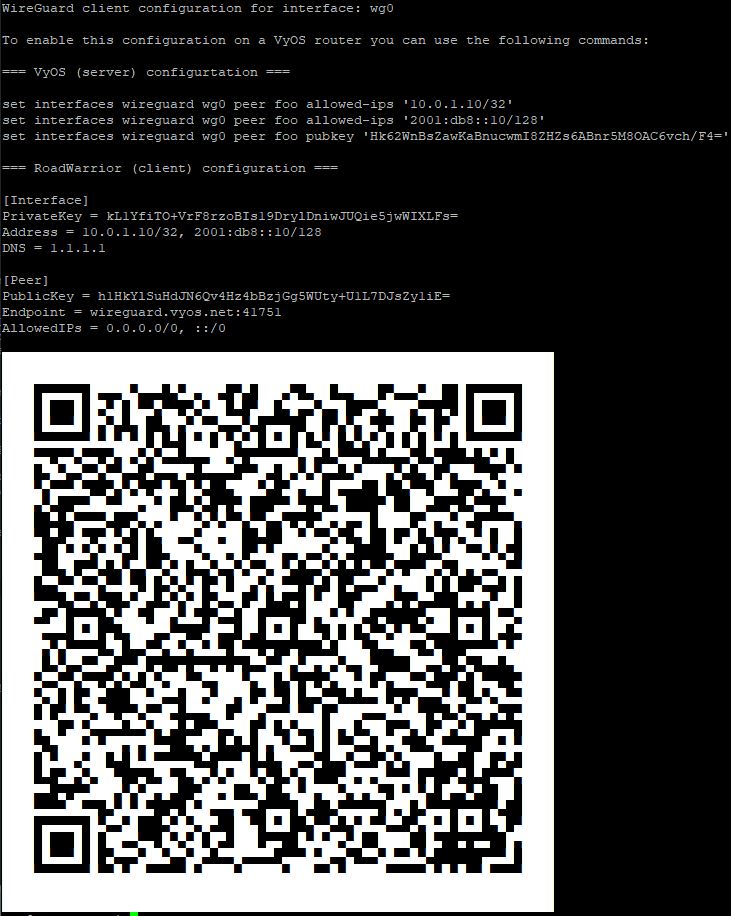
Remote Access “RoadWarrior” clients
Some users tend to connect their mobile devices using WireGuard to their VyOS router. To ease deployment one can generate a “per mobile” configuration from the VyOS CLI.
Warning
From a security perspective, it is not recommended to let a third party create and share the private key for a secured connection. You should create the private portion on your own and only hand out the public key. Please keep this in mind when using this convenience feature.
Using this command, you will create a new client configuration which can
connect to interface on this router. The public key from the specified
interface is automatically extracted and embedded into the configuration.
The command also generates a configuration snipped which can be copy/pasted
into the VyOS CLI if needed. The supplied <name> on the CLI will become
the peer name in the snippet.
In addition you will specifiy the IP address or FQDN for the client where it will connect to. The address parameter can be used up to two times and is used to assign the clients specific IPv4 (/32) or IPv6 (/128) address.